How to Create a Simple HTML5 Contact Form
In this tutorial I will show you how to create a very simple, to the point contact form that will be very easy for you to understand. Creating a form in HTML5 only differs slightly as HTML5 brings in a few more attributes to the table that enhance the form filling experience making both developer’s and user’s life easier; besides that there isn’t much difference.
First, the design
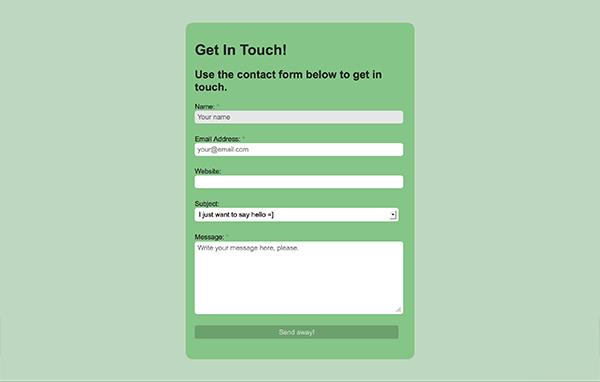
In order to create a contact form, you should have a design in mind of what you will be creating. Below you can see what our contact form will look like. Like the title of this post suggest, this form is very simple and clean; there is really nothing else to it as after all, this is only a contact form.

The structure
We will start off with the basic HTML structure so that we have everything in order. As you can see this snippet is filled with all of the necessary elements, their classes and ids as well. You will also find that the labels, placeholders, values and options all have been filled in too.
	<div id="contact-form">
		<h1></h1>
		<h2></h2>
		<p id="failure"></p>
		<p id="success"></p>
		<form method="post" action="emailForm.php">
		   <label for="name">Name: <span class="required">*</span></label>
		   <input type="text" id="name" name="name" value="" placeholder="Your name" required="required" autofocus="autofocus" />

		   <label for="email">Email Address: <span class="required">*</span></label>
		   <input type="email" id="email" name="email" value="" placeholder="your@email.com" required="required" />

		   <label for="website">Website: </label>
		   <input type="web" id="webstie" name="website" value="" />

		   <label for="subject">Subject: </label>
		   <select id="subject" name="subject">
			  <option value="hello">I just want to say hello </option>
			  <option value="quote">I'd like a quote</option>
			  <option value="general">General</option>
		   </select>

		   <label for="message">Message: <span class="required">*</span></label>
		   <textarea id="message" name="message" placeholder="Write your message here, please." required="required"></textarea>

		   <input type="submit" value="Send away!" id="submit" />
		</form>
	 </div>
The validation
Unfortunately, I will not be going over how to make this contact form work. As you can see in the code there is a method and action that links to a PHP file that you could set up yourself. But, this is a tutorial for just the creation of the form.
	<form method="post" action="emailForm.php">
		</form>
However, there is something I would like to point out. Thanks to the new innovations and capabilities of HTML5, you’ll notice that there are a few fun attributes in the input field’s code. If you take a look at the input code for the email, you’ll find that the type of the input has been defined as email, which is new and amazing. This means that once you click send the form will automatically validate for an email, if the entered text isn’t an email an error will be thrown.
Additionally, the required attribute makes sure that the form automatically checks that you have filled in the required fields. Lastly, the placeholder is another one of those HTML5 wonders that allows you to have a text within the input to explain what the input is about; the text disappears once you click on the input and type something. These three little things have an amazing effect on creating forms as it gets rid of a lot of programming.
<input type="email" id="email" name="email" value="" placeholder="your@email.com" required="required" />
The content
I know that most of the content was filled in the previous section however some things are still missing. Check them out below; they are the first four elements within the contact form div.
	<h1>Get In Touch!</h1>
		<h2>Use the contact form below to get in touch.</h2>
		<p id="failure">Opss.. something went wrong.</p>
		<p id="success">Thank you, your message was sent successfully.</p>
The style
The very last thing you’ll need to do is fill out the style of the form so that it looks amazing. You can imbed this within the head of the HTML document or link it as a separate CSS file. It is all up to you.
Let’s start with the general style; as you can see there is not a lot going on for the body of this page as the body itself will depend on the style of the website.
	body {
		background: #BFD7C1; /* light green */
		color: #262626;
		font-family: Arial, san-serif;
	}
Now let’s style the actual contact form. As you can see, we are keeping the CSS minimal – only writing and overriding what is necessary. The CSS is very clean and simple, as it always should be. This is not a complex stylesheet. There is not a lot going on; the inputs are basically the same.
	#contact-form {
		background-color: #87C489;
		width: 465px;
		padding: 20px;
		margin: 50px auto;
		border-radius: 15px;
		-moz-border-radius: 15px;
		-webkit-border-radius: 15px;
	}

	#contact-form input,
	#contact-form select,
	#contact-form textarea,
	#contact-form label {
		font-size: 15px;
		margin-bottom: 2px;
		font-family: Arial, san-serif;
	}

	#contact-form input,
	#contact-form select,
	#contact-form textarea {
		width: 450px;
		background: #fff;
		border: 0;
		-moz-border-radius: 5px;
		-webkit-border-radius: 5px;
		border-radius: 5px;
		margin-bottom: 25px;
		padding: 5px;
	}

	#contact-form input:focus,
	#contact-form select:focus,
	#contact-form textarea:focus {
		background-color: #E5E6E7;
	}

	#contact-form textarea {
		height: 150px;
	}

	#contact-form #submit {
		width: 450px;
		color: #BFD7C1;
		border: none;
		background-color: #6EA070;
	}

	#contact-form #submit:hover {
		background-color: #BFD7C1;
		color: #6EA070;
	}
It is also important to get rid of the browser default styles that come with the required attribute. They can ruin a look very quickly if they are not taken care of. Additionally, let’s add some style to the required asterisk.
	input:required, textarea:required {
		box-shadow: none;
		-moz-box-shadow: none;
		-webkit-box-shadow: none;
		-o-box-shadow: none;
	}

	#contact-form .required {
		font-weight:bold;
		color: #E5E6E7;
	}
The very last thing we will do is hide the success or failure messages as they should only appear once a user has decided to click send. In a fully functioning contact form, these messages would be programmed to appear based on whether the form has been validated correctly.
	#failure, #success {
		color: #6EA070;
		display:none;
	}
In conclusion
Well, that is all; once again this was a very simple contact form. I hope you understand what it means to create one in HTML5 and style it with CSS. This is not scary or complex and I do hope you’ll enjoy making more amazing forms based on this tutorial, not only contact forms.
