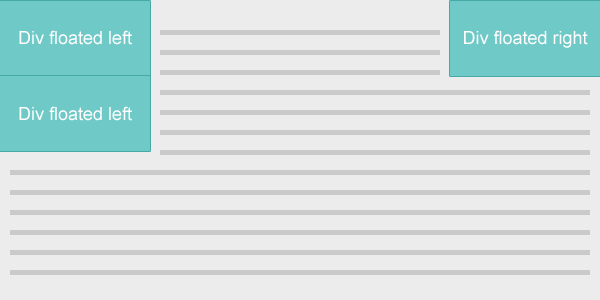
How does the Float Property Work
Float property is in fact a very useful property that in a way is an alternative method to manipulating the way elements are displayed. It is a highly valued asset within a developer’s tool kit as it makes stylizing simpler. However, it also has its downfalls as it can cause some serious issues if you don’t know how to go about using this property
What exactly is the float property?
Typically you will use the position property if you want to move an element elsewhere; however you can use the float property to also manipulate where the element will be within the flow of the page. This property has its roots in print where images were placed left and right of text and the text wrapped around the image. This is exactly what the float property does for web design.
It is most common to use the float property to wrap text around an image or some other element; however, they can also help create a website’s layout. This property is very versatile and can be used in a variety of ways to manipulate the look of the website.
How does it work?
A floated element actually comes out of float from the remainder of the content/element. This is where the property gets its name; this is also what allows the element to be shifted as it is no longer contained by the remaining elements. An element which is floated left, for instance, will shift to the left most edge. Vice versa for right floated elements.
The syntax
The property is very simple to figure out. There are four values; none is the default. Inherit is there to take effect of the values of the parent element. Lastly, you have left and right values which determine the direction of the element within the flow, respectively of course.
	#box {
	float: right;
	}

What happens when a box is floated? It is taken out of the default float of the page elements. It is then relocated as far as possible to either left or right with the remaining content flowing around it; when you are floating an element it will try to go as far a possible by either touching the outer edge of the parent element or an edge of a fellow floating element. This is where the property gets its name; it literally makes an element float. Additionally, you should note that a floated element becomes a block box which allows it to have the ability to actually be floated left or right.
The clear property
The clear property is used in addition to the float property, if you choose to use it. Its purpose is to clear, like the name suggests, an element from the float. Basically, if you have three elements, the first two have a float left set on them and the last one has a clear property, the last element will not float anywhere, it will stay below the previous two while they are floating either left or right.
	#box {
		clear: left;
	}
The issues
Unfortunately, the float property has many issues. Sometimes using the clear property helps but not always. There are a variety of layout downfalls with the float property. Let’s discuss the two most common issues.

The collapse
When you have a parent element whose children all have an assigned float, the parent will collapse. It literally disappears. Sometimes if there is something within the parent that is not floated, it will collapse only up to a point; however you may not be this lucky sometimes and even if this is still an issue. Although this may not always pose a problem – it all depends on your design and layout. However, most often than not this will in fact be an issue so let’s talk about how we can fix this.
Fixing the collapse
First thing you should try is adding a clear:both to the following element. At times this may do the trick and your layout issue may be fixed. If that’s the case, good for you.
	#box {
		clear: both;
	}

Another clever trick you could do is apply the following snippet to the parent element in order to get rid of the collapse. Basically, what this snippet is doing is telling the parent element that in fact there is some content within it but it is not visible – hence this is just a trick.
	.clearfix:after {
		content: ".";
		visibility: hidden;
		display: block;
		height: 0;
		clear: both;
	}
Overflowing elements
Another issue that may arise as a result of using float is that when you use an image that is bigger than the element, the image will spill out onto the surrounding element. For the most part, this will not disturb the layout itself but it can look a bit awkward having an image hang out from one element and onto another.

Fixing the overflow
There are two ways you can fix this issue. First, you can make sure that you use an image that is not bigger than the element. You can resize it if the need be in a photo editor or by adjusting the width and height in either HTML or CSS. However, you can eliminate the actual overflow by setting the image’s parent element’s overflow to be hidden. It is that simple and it works like a charm.
	#box {
		overflow: hidden
	}
